Monday, February 28, 2011

OPI - I Get A Kick Out Of Gold

I bought this polish AGES ago, probably the beginning of last year, and yesterday I was going through my boxes to find polishes that I hadn't swatched and I found this one.  I can't believe I forgot about it and it got lost amongst my stash.  I didn't even include it in my gold foil comparison.  I'll have to do another one now.

The above photo was taken in the sun, below indoors under artificial light.  OPI - I get a kick out of gold is an older polish, but you can still get it on ebay.  But, given that there are so many gold foil polishes out there that would be almost dupes of this, it's not one that you need to go out and get.  What I like about this gold is that it is a cool tone (like Orly Lux and Jessica Palladium). This was three coats + one Seche Vite.

To mix it up a bit, last night I added two coats of LA Girls Rock Star Double Platinum.  I love this polish but have never been able to get it opaque enough to do a swatch of it on its own.  LA Girls Rock Star Double Platinum is a holographic glitter in a slightly smokey, almost clear base.  Here is the full sun pic from this morning.

Under artificial light last night.


And the obligatory blurry shot to show the glitter.

It makes me smile looking at my nails today, what a shame I have to take it off to put on the green magnetic polish that turned up in the post today!! 

OPI Texas collection- Big Hair Big Nails

OPI's Texas Collection is 12 shades, 6 are what they call sorbet...I call them jelliesand I'm stubborn and don't take to change well so they will be referred to as jelly. :oP~The first one up is Big Hair Big Nails a Red jelly that is almost a coral/orange toned red.If you've been reading my blog long then you know I love red and I loooooove Jellies(I do not like the name at all)This is 3 perfect

Soak Off Gel vs Nail Polish

Good morning, Dear Reader!

I decided to get over myself and deal with uneven nails for a week for many reasons, the greatest of them being that I wouldn't like myself as much if I were so high maintenance that I'd change it right away.  I've also been enjoying have sparkling pink nails far too much to interfere with them, so I figured that today I'd show you some better pictures of IBD Be Mine and do a rundown of what I see as the advantages and disadvantages of the soak off gel (or gel polish) as compared to nail polish from my current newbie point of view.  I'm sure in a month I'll have even more opinions, but it seemed like it might be useful to do now as well.

When I took pictures of Be Mine on Saturday, I wasn't yet over myself or my uneven nails enough to take the seventeen trillion different pictures it took to get a couple that are color accurate and show the cool glitter, but I am today.  I didn't want to sell this one short because I really fell in love with it when I saw a color dot on IBD's site.  It's in a Valentine's Day set called Kiss and Tell with three other colors for $25, but after doing some heavy-duty searching, I found it for $9 shipped, which was reasonable enough to try it.  So far, I'm thrilled, but since it's pink glitter in a pink base, that's predictable.  It still took two pictures to give you a fair look.

IBD Soak Off Glitter Gel Be Mine
IBD Soak Off Glitter Gel in Be Mine, Accurate for Base Color

IBD Soak Off Glitter Gel in Be Mine
IBD Soak Off Glitter Gel in Be Mine, Better View of Glitter
It seemed like it might be handy to have gel pictures on the same page as the pros and cons for visual reference, but since we're all really clear on what nail polish looks like, it didn't seem necessary to put a picture in for that.  To compare them, I'll just start at the start, and my use of the word "gel" refers to both soak off gel and soak off gel polish.

  • Nail Prep: gel carries two extra steps, application of primer and bonder.  Otherwise, it's the same as for polish, just filing, cuticle care, and cleaning up, but as we see this week, errors in filing aren't as easily corrected with gel since breaking the seal on the gel kind of defeats the purpose of wearing it.  I prefer nail polish for this part.
  • Application: nail polish is much, much faster.  For me, neither is easier because a consequence of the slower pace of gel application allows for greater care to be taken, which makes it easier.  Mistakes with gel application can largely be corrected before curing, with the exception of the thing giving me a hassle, perfectly even sealer that doesn't touch any skin, applied with a nail polish brush.  It's so shiny that it's difficult to tell that it's uneven, and in both gel applications I've flooded one corner of one cuticle with sealer.  Next time, I'll apply it with a gel brush and that may solve that.  I prefer the outcome of gel application, but my attention span strikes again making it difficult for me to wait for things to cure between steps, so as far as the actual process of application, I prefer nail polish by a lot.
  • Wear: here, gel very obviously is preferable.  My Gelicure Hot Pink lasted only six days with zero wear showing  (chips, worn edges, and break in the seal) because the outgrowth bothered me.  One of these days I'll have the nerve to commit to wear one until there's a chip.
  • Appearance:  gel's a clear winner to me because of the finish - it's really much more shiny than polish can be.  The Be Mine manicure pictured above is finished with a sealer not as shiny as last week's and it's on its third day.  Even at that, it's shinier than polish with Seche Vite or Diamont an hour after applying it.  I think the fact that I can say that when the gel's a heavy glitter with one super thin coat of sealer is pretty impressive - it would take a ton of top coat to smooth out that much glitter in a polish.
  • Protection of Nails: protecting my nails has always been just as important as appearance with wearing nail polish.  My nails break almost immediately if they're bare, and polish does a decent job of keeping them okay.  Gel, however, does an amazing job.  In addition to not breaking, my nails aren't wearing down in their usual spots from everyday life, and this is the first time that has ever happened.
  • Removal: nail polish is way easier for me.  The biggest complaint I have about soak off gels in general is putting the stupid foil on my nails, it's just such a ridiculous hassle.  If I'm going to be adult and reasonable, I'll admit that it's a weird annoyance and it's not really a big deal, but either way, polish is far easier.  There's also the fact that in trying a new to me brand (IBD) and a new to me product (soak off gel in pots rather than a polish bottle), I am concerned about whether it will come off, which simply isn't an issue with polish (I always know that even the scariest glitter will eventually come off).
  • Other: I had a slightly odd experience with the IBD gel over the weekend - late Saturday afternoon, my nails started to feel a little too tight for my nails beds.  Not painful or bad, just like they were about three pounds to heavy for the jeans they wore to a good Italian restaurant where they loaded up on pasta.  It's gone now, but was odd.  The other thing worth mentioning for me is the convenience of gel as a base for nail art - I find I'm willing to spend 20 minutes decorating, where if I have to apply a polish base I'm far less motivated by the time I'm able to finish it, and there's also the benefit of unlimited do-overs with gel as the base for nail art done in polish.
That's just about all that I can think of that has occurred to me thus far in the grave matter of soak off gel versus polish, Dear Reader, so I suppose I'll just wrap it up.  Until next time, love and nail polish to you!
 

Sunday, February 27, 2011

3d Nail Art!

So I finally received my order a couple weeks ago so I thought I'd do some experimenting on my nails. 
The fruit slices are so cute but they come in sticks and I had to slice them individually which too ages! I still need to practice with the 3d flowers though, they're sculpted with acrylic powder & not premade or anything but good enough for a first time. Now I look like an idiot with falsies on one hand and none on the other. owell!
Did flowers on my sis in law's nails too, Sorry for the bad photo, I was tiptoeing to take this & well.. it just didn't turn out right lol.

I'm looking for some more ideas so if you have any images of 3d nail art show me please! :)

Matte & rhinestone ♥

Hi~ :) This matte & rhinestone mani is inspired by Katrina's nail art mani here, I love the combination so I decided to try it out myself. I used one coat of Ulta3 black satin on my fourth finger before layering on two coats of Color Club Magic attraction. The rest of my nails were painted with two coats of Orly Matte Vinyl.

matte nail art

The rhinestones were stuck on with a top coat - normally I seal them in with another coat after sticking them on but hopefully they'll last me through the day at Uni tomorrow.

Thanks for dropping by~
Sharon

Saturday, February 26, 2011

Born Pretty Store and my First Freehand Nail Art

I received a few items from Born Pretty Store a few weeks ago to review. You've already seen some of the Bullion put to use and I'll cracking out the rest of the amazing nail art supplies in good time. Here are the goodies that I got....


I've wanted some of these tiny brushes for ages. I did buy a pack of nail art brushes on eBay but there are very few that are suitably teeny for painting designs like this on your nails and I'm actually using one of them to apply my eyeliner!!

This pack of 4 brushes is perfect for drawing anything you can imagine on your nails. They're small but easy to grip and each one is a different size so you can use the smallest ones for lining and the larger ones for filling in colours.

I decided to try my hand at roses, which are heavily inspired by (read: copied from) Marina at Forever The Ugly Duckling who does some really cute and imaginative, yet simple, freehand nail art which is what actually inspired me to have a go myself.

I started out drawing the outlines of the flowers then filling them in with the blue. Then I went over the outlines again to emphasise them since the blue kind of covered them over. Then I decided to add the leaves by doing the  same thing - outline, colour, outline again!


I'm really pleased with how it turned out and I'll definitely be doing more freehand nail art in the future if I can come up with any ideas! If that's something you guys would like to see?


I used:
Brushes from Born Pretty Store
Barry M Berry Ice Cream as a the base colour
Rimmel Black Satin to outline the flowers
Beauty UK Neon Blue to fill the flowers
BYS Fern for the leaves
Top coat of NYC

Disclaimer: The nail art brushes were sent to me by Born Pretty Store for review. Everything you read here is my honest opinion.

Magnetic polishes - Purple and Rust Red

Here I have two more of my new magnetic polishes from Nail Art and More.  This one is called Purple and its super pretty.  The bottle colour is the same as the pale colour on the nail, then when you use the magnet it brings our the darker purple colour.

These polishes have the most beautiful colours in them.  This one has a blue, pink and purple shimmer which can be seen the pic below.

My application of the magnets is getting much better too.

Here is Rust Red. Again the bottle colour is closer to the pale colour on the nail, then with the magnet the darker rust colour lifts out.

I think I prefer the lines magnet to the star one, maybe because its a little more forgiving with bad alignment. 

If you don't get the star magnet lined up correctly on the nail it looks pretty shoddy.

As promised, here are the magnets and the positioning tool.

The base of the positioning tool has a little target on it so you know where to put your finger. 

You then tread the magnet design you want to use onto the fork and position it at the right height for your nail.  I then paint my nail while its still on the target and immediately place the fork, with the magnet, over my finger and hold for 10 seconds.

There you have it.  I'm now just waiting for my Green polish that was missing to turn up, and then to go shopping on their site again, as they have told me there will be seven new colours on their site in the next couple of weeks.

IBD Soak Off Color Gel Be Mine

Good morning, Dear Reader!

I decided to change colors yesterday, at the end of six days of wearing Gelicure Hot Pink.  I took pictures right before removing Hot Pink yesterday, but I can't find them anywhere!  You'll see as today's tale unfolds, I was completely out of sorts yesterday.  That means the last picture of wear is from Day 5, and that was yesterday's picture.  There was no chipping or wear at all, and even the gel on the edges of my nails from wrapping my tips had no wear, but outgrown polish has always been distracting to me so it had to go.

Removing Hot Pink wasn't bad at all.  The worst part of it was getting the stupid foil to stay on my fingers.  At one point, I got all mad, took them off, swore a whole lot, then redid them so they'd stay on.  What a frustrating expenditure of effort!  The remover stayed on for ten minutes, and when I checked the first nail it looked like it might need more time.  I used an orange stick to scrape down the middle of the layer of gel, and that made it come off.  By the time I removed the last foil a few minutes later, the gel fell off in one big piece.

After the swearing episode, I should have taken a break after removing the old gel, but I didn't.  At the time, tidying up the shape of a few of my nails using the coarse grit sandpaper-y file I had handy to break the seal on the Hot Pink before putting on the remover seemed like the wisest choice, so I did it.  Quickly, and evidently without comparing the length of nails I'd filed to those I had not.  Then I applied new gel, which complicates matters further, you'll see.

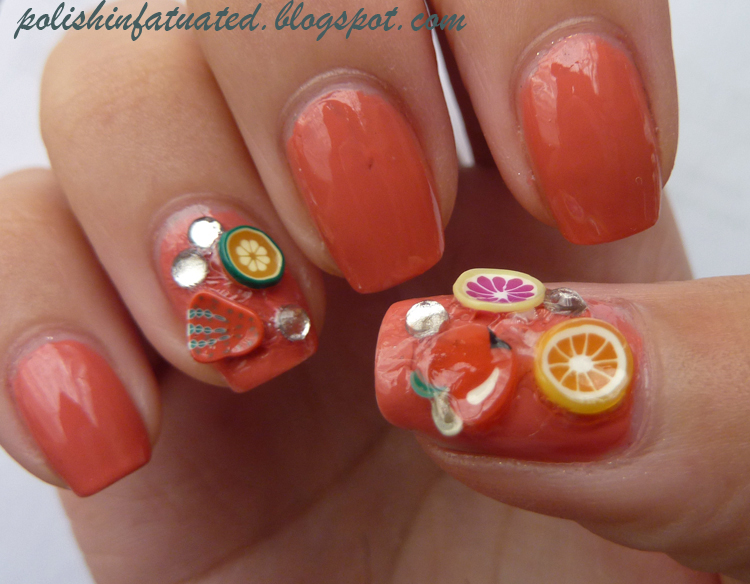
I used an IBD Soak Off Gel that came in a little Valentine's Day pack of four shades called Be Mine.  It's a pink base with pale pink and hot pink glitter.  I went through the preparatory steps of applying primer and bonder, and then the gel.  I did one thin layer of clear before two really thin layers of the color.  This kind comes in little pots rather than being packaged like nail polish, so I used a gel brush to put it on.  The gel brush is a squared off, somewhat flattened, short brush, and the gel itself is WAY thicker than Gelicure.  Gelicure's about what I'd expect gel to be, but the pot kind is more like cookie dough that spreads out.  The down side to that is that in mixing it up before application it's hard to avoid air bubbles, but the up side is that it's really easy to control.  After applying the gel, I put on a coat of IBD Intense Sealer, one of two recommended ways to finish the manicure.  Intense Sealer is not soak off, so I'll have to file it off in order to remove the gel under it.  Here's the finished manicure, with better and thinner application than last week.

IBD Soak Off Color Gel Be Mine
IBD Soak Off Color Gel in Be Mine
Want to hear the thought process that resulted in that markedly shorter ring nail and misshapen pinky nail?  After my "it was a good idea at the time" filing, I considered filing all of them, and thought, "Eh, no one will notice."  In what universe is that not noticeable?  It reminded me of something I hadn't thought of in a long time.
When I was a kid, my mom always wanted a dog.  She'd wanted one since she was a kid really, but once my sister and I weren't tiny was the her first opportunity to have one.  She'd try to convince my dad that "the girls really need a pet," which would result in a trip to Fish Emporium with my dad and a toiletside ceremony a few weeks later.  When I was 8, she finally just told him she was getting a dog and went through a process of interviewing breeders until she found the perfect dog, a black miniature poodle.  She'd hold him in her lap at night and pet him, and she especially loved his long, flowing ears.  One day when I was 9, after we'd had him about a year, my sister and I were home alone after school (that was normal), and she decided we should play Hair Salon with the dog.  I was a nervous little kid, always the one standing ten feet back saying, "I don't know if this is a good idea..." and she was the adventuresome kind with bad ideas that could and did result in injury and/or property damage, always answering my concerns with, "It'll be fine."  This case was no different than any other...

I was willing to participate in Canine Hair Salon only as far as having an arm around the poor dog to keep him calm.  She got the scissors and gave the dog a little trim on one ear.  But that made him uneven, so she had to trim the other.  I checked her work, and now the first ear was longer.  After a few rounds of that, she got serious, did it right, and had me check.  The dog's ears were finally even, but each looked like a little puffy triangle with the third point at the middle of the dog's ears, like his stylist had put a Dorothy Hamill  twist on traditional poodle ears.

Triangle Hair
My response at first was to laugh, then of course I got nervous.  I said, "Mom's going to be mad."  She answered, "Mom won't notice."  Even nine-year-old me knew that was ridiculous, and after I finished my nails and saw the uneven ones (there are two others on my right hand!), I had a moment where I simultaneously felt like my sister as she sat there looking me dead in the eye and telling me my mom won't notice that she just Dorothy Hamilled the poodle and skeptical nine-year-old me knowing there's no way that's going to fly.  The lesson I take away is that if there's something I knew was a ridiculously stupid idea thirty years ago, it's likely that it will be at least as stupid today.  Hence my nails.

The complication here with the sealer is that if I file to even things out, I'll break the seal.  If the sealer were soak off, I'd just do that and apply a second coat of sealer to the whole thing, but this sealer has to be filed off and I made an effort to keep it very thin, so a second coat of it isn't something I'd be up for.  Just filing and leaving the seal broken would normally be a reasonable approach likely to shorten the life of the manicure, but I don't want to do that since it would be an unfair (well, useless) product test if I did.  So my options are change it or live with it.

I'll probably have to change it just so I don't have to cringe and say, "WTH, Self?" every time I go to take a picture this week.  I can't believe I Dorothy Hamilled my nails!

That's about it for the State of the Nails and today's storytime, so until tomorrow, love and nail polish to you!  

Friday, February 25, 2011

Fruit fimo nail art~

Hello~^^ Today I have a nail art using fruit fimo. This was my first time using them and I think there's definitely room for improvement! I applied two coats of Ulta3 watermelon for the base colour then a coat of top coat to stick the fruit fimo and rhinestones with. Application looks sooo messy here in the photo but it actually doesn't look that bad in real life. I still need lots of practice and I don't understand why the fruit fimo decided to curve up after the polish dried :(. They all stayed on until I decided to remove them though.


Thanks for dropping by~
Sharon

Olive You, Leopard!


I love weird leopard print color combinations, and this one is no exception. Its colors remind me of green olives with the pimentos in them, sitting in the jar waiting to accompany some poor schmuck's gin. 

I can't take credit for this color combination, to be honest, I saw a rug that had the pattern, and I adored it (I wish I had bought it!) so I snapped a picture knowing that it would find its way onto my nails at some point.  I love the 'gradient' (ok not so much a gradient as a color change) from the tip of the nail to the cuticle edge.  The color of the orange shows up really red in the pictures, but its more of a burnt orangey red in real life. I think someone needs to develop one of them so I don't have to mix it. (think Essie Alligator purse, but more orange than red)

Anyway, on to the nails- for now all I have are pictures from the iPhone, because my camera is MIA right now. Hopefully I find it tonight, so I can take a picture of them with a real camera before they get destroyed by acetone. :)  


I used American Apparel California Trooper> as a base, with American Apparel MacArthur Park for the green, and a mix of Essie Alligator Purse and China Glaze Life Preserver for the orange. Topped it all off with 2 coats of Seche Vite top coat.


Orly Cosmic FX Collection - Lunar Eclipse

So here is it, my favourite.  So pretty and sparkly and blue.  Apparently is a dupe of OPI Designer Series Magic and Sally Hansen Ultra HD Laser, but I don't have either of those, so I just love it.  I know it doesn't have the same multi chrome, or even duo chrome thing going on as Space Cadet, but sometimes you just put a polish on and fall in love with it, and that is what happened with this one.

The above shot was taken in full sun, and it was so sparkly that this picture doesn't do it justice.  Below shot was taken indoors, and you can still see the glossy magic of the polish.

Here it is up close.  Just look at all those rich blue sparkly flecks.  It reminds me of the sun reflecting off the rippling water on our pool. I feel like I could just jump in.

So there you have it, the magnificent Orly Cosmic FX collection.  Go now and get it.

Purple Franken

Hallo ladies,

Well it's finally Friday well soon to be Saturday here but Oh well, I wanted to post about this mani yesterday but I've been busy the last few days. I love the way this polish turned out I named it after my little girl (Alizia) that died in 2007. I don't know why but everytime I see the color purple I think about her <3 hubby thinks the polish is so beautiful!!!! When the sun shines on this beauty it explodes with different color glitter, I see purple,red,green,yellow and abit of blue :) I used 2 coats for this mani with no top coat.


So what do you think aint she a beauty?

Thanks for looking.
Kesha

Plate XL A - The Puzzle

Good morning, Dear Reader!

My Gelicure mani is still hanging in there, so I'm still changing it around to keep it interesting.  For yesterday's variation, I brought out the XL plates and looked for something to do in white, and I chose the puzzle pieces tip pattern.

I stamped that in Konad white, but it still looked a little plain, so I hunted down some nail art pens to fill in a few of the pieces.  I added Color Stay top coat and Poshe, and this is what it looked like when I was finished.

Stamping Plate XL A - Puzzle Pieces
Stamping Plate XL A - Puzzle Pieces and Nail Art Polish
I really like how this one turned out, and to be honest, I was surprised to see a few tiny smudges in the nail art polish when I was selecting a picture - I can't see them even when I'm looking for them.

What I'd forgotten about changing color once a week is how much I hate it when it looks grown out.  Yesterday was the five days of wear, and I was reminded by my own annoyance that it's always around the fifth day of a manicure that it starts to bug me with the line at the cuticle.  However, the soak off gel has otherwise been so painless that I'm going to let it slide until tomorrow.  Other than the giant gap, it looks just like it did right after I applied it.

That's today's variation on the Hot Pink theme, so until next time, love and nail polish to you!  

Thursday, February 24, 2011

Orly Cosmic FX Collection - Space Cadet

WTF I hear you say, are you serious, Space Cadet is only your second favourite polish in this collection?
Well, yeah.  I seriously love this polish, in fact I'm wearing it again right now. Last night I wanted to make sure I was happy to put this is second place so I put on a full mani of it again.  But I'm sure, I'm a sucker for blue polish and I just love Lunar Eclipse more.

This polish is a bright and foily multi chrome polish. My photos of this polish make it look more bronze than it does in real life.  On me, I see much more purple and pink tones.  But there is orange and gold and blue as well. 

Here is the up close shot.

If you don't own this polish then you MUST get it. I can see this becoming hard to find in the not too distant future.  Everyone is raving about it on their blogs, and deservedly so, it is truly unique, there is no other polish like it.

♪♫ I don't blame you, it's what I love you for...

I'm super tired today so it's just a quick post. I sorted out my hair - decided to dye it Auburn and it's turned out really nice. Still patchy in places but that can be passed off as highlights!

(Pete Lawrie - All That We Keep)


Konad Plate: M54
Base Colour: Franken
Konad Colour: W7 - Black
Top Coat of NYC


My Impressionist Funky French

Good morning, Dear Reader!

After using a dotting tool for the dots I added to the chevron tips I showed you yesterday, I got to thinking that filling in my tips with just a bunch of tiny colored dots might be interesting.  I gathered about a zillion nail polishes that are Springy and opaque, got the dotting tool and a paper plate, and had at it (this was from a few days ago, so the gap at the cuticle's small).

As I was placing the dots, I thought it looked like an Impressionist's rendition of a Funky French, being characterized by bright color, open composition, and super tiny brush strokes.  Here's what I came up with.

Folk Socks Manicure
Impressionist Funky French over Hot Pink Nubar Gelicure
I think under many circumstances, I could look at the finished manicure and say, "Yes, I see how that could be an Impressionist mani."  Unfortunately, I can't.  As I looked at the manicure after sealing it with top coat, I could think of one and only one think that's set apart by the use of bright colors and an ornately orderly multicolored edge, and that's folk socks.


The price I'm paying for reading too much Interweave Knits Magazine is that my brain now perceives my manicure in terms of socks.  That's an unexpected outcome!

I think we can all agree to pretend that this manicure is actually a deep, meaningful artistic statement, connecting an innovative 19th century Parisian art movement to the crafting traditions of the back hills of Appalachia.  I'll have to go ponder the meaning of existence for a bit to come up with something equally profound for tomorrow, so until then, love and nail polish to you!